How to Deploy a Node.js App on Azure Container Apps
If you've outgrown simple VMs and want to skip the overhead of managing Kubernetes yourself, Azure Container Apps (ACA) is the right move in 2026. It abstracts the server and cluster management while giving you full control over your Docker environment. No OS patching, no cluster nodes to babysit — just deploy a container and define your scaling rules.
This guide walks through the full pipeline: building your image in the cloud, pushing it to a private registry, and running it as a Container App — with your MongoDB connection wired in correctly so your app doesn't die on startup.
The Architecture: What You're Building
Before touching the portal, understand the separation of concerns:
| Component | Role |
|---|---|
| Azure Container Registry (ACR) | Your private image storage — the "pantry" where Docker images live |
| Container App Environment | The secure network boundary (VNet) and logging workspace (Log Analytics) |
| Container App | The running instance of your image — scales up and down automatically |
| Revisions | Every config change (env vars, image tag) creates a new revision — enables zero-downtime deploys |
Step 1 — Create an Azure Container Registry
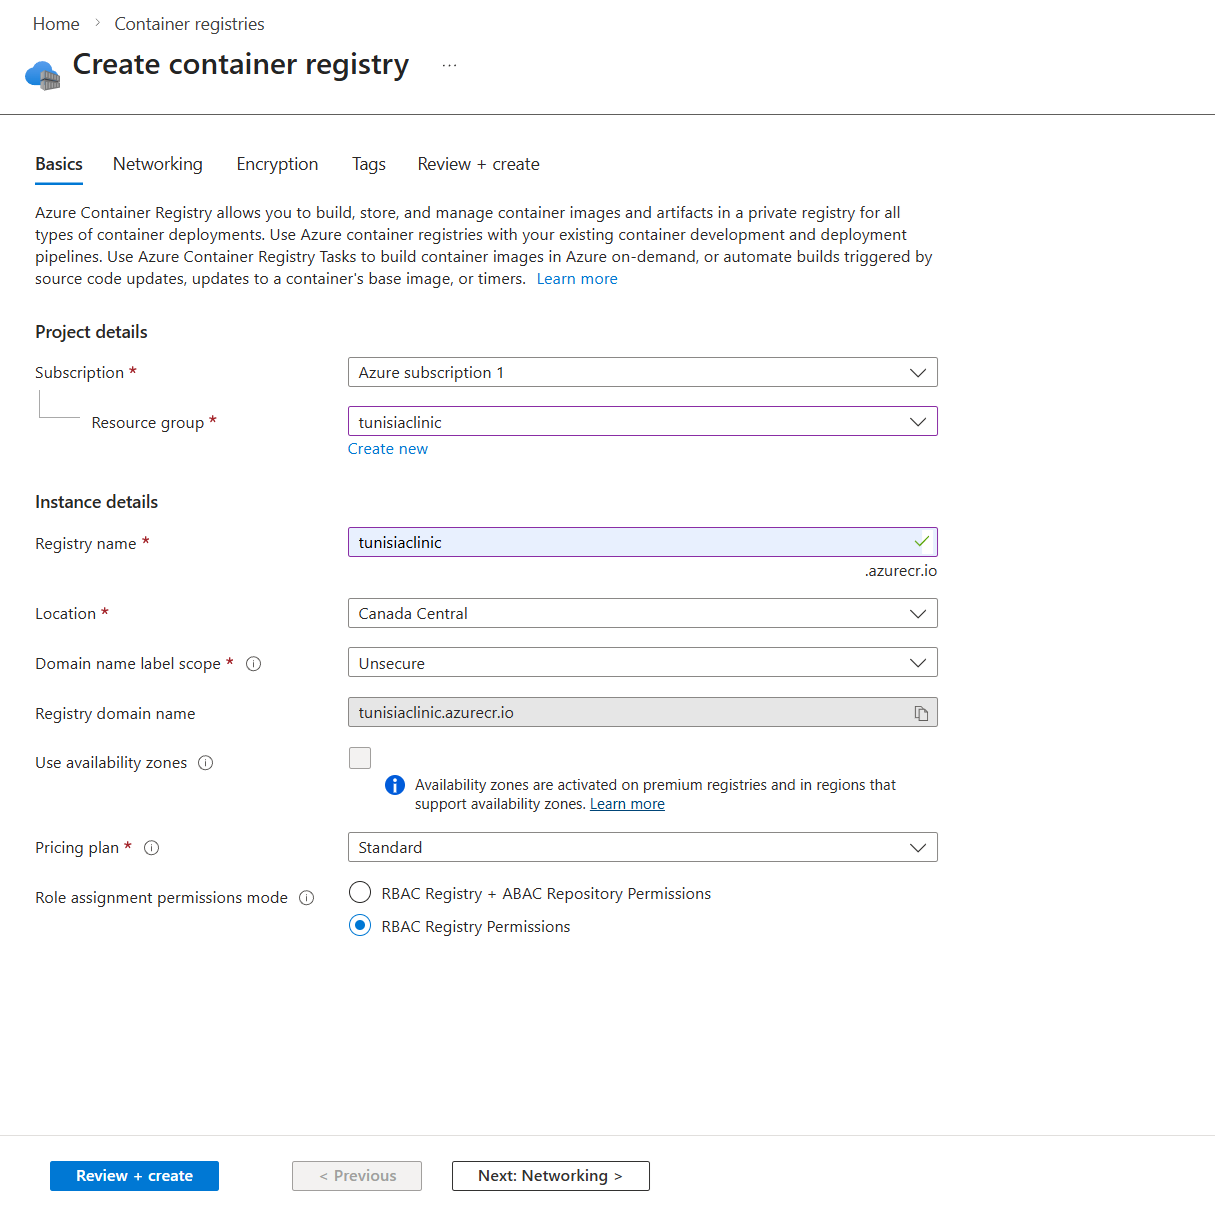
In the Azure Portal, search for Container registries and click Create.
Fill in the basics:
- •Registry name — must be globally unique (e.g.,
myappregistry) - •Location — pick the region closest to your users
- •SKU — Basic is fine to start; upgrade to Standard or Premium if you need geo-replication or private endpoints
Once created, navigate to your registry and copy the Login server value (e.g., myappregistry.azurecr.io). You'll need this throughout the guide.
Step 2 — Build Your Image in the Cloud (The Right Way)
In 2026, building images locally is a trap. If you develop on a Mac with Apple Silicon (M1/M2/M3), your local Docker image is built for the arm64 architecture. Azure runs amd64 Linux. The result: a container that builds fine locally and silently fails in production.
The fix is ACR Tasks — you push your source code to the registry and let Azure build the image in the cloud on the correct architecture.
Authenticate with Azure CLI
Before running any az command, you need to be logged in. Run:
az login
This opens a browser window to complete authentication. Once done, verify you're targeting the correct subscription — this matters if your account has access to multiple Azure subscriptions:
# List all subscriptions your account has access to
az account list --output table

# Switch to the correct one if needed
az account set --subscription "My Subscription Name"

# Confirm the active subscription
az account show --output table
Always confirm the active subscription before provisioning resources. Accidentally deploying to the wrong subscription is a common and annoying mistake to undo.
Add a Dockerfile to Your App
ACR Tasks builds your image from a Dockerfile at the root of your project. If you don't have one yet, here's a production-ready example for a Node.js/Express backend:
# Use a specific Node.js LTS version on Alpine for a small image
FROM node:20-alpine

# Set the working directory inside the container
WORKDIR /app

# Copy package files first — lets Docker cache the install layer
COPY package*.json ./

# Install only production dependencies
RUN npm install --omit=dev

# Copy the rest of your source code
COPY . .

# Expose the port your Express app listens on
EXPOSE 5000

# Start the server
CMD ["node", "server.js"]
A few things worth noting:
- •
node:20-alpine— Alpine Linux keeps the image small (under 200MB vs ~1GB for the full Debian image). Use a pinned version, notlatest, so your builds are reproducible. - •Copy
package*.jsonbeforeCOPY . .— Docker caches each layer. If your source code changes but your dependencies don't, Docker reuses the cachednpm installlayer instead of re-running it on every build. - •
--omit=dev— skipsdevDependencies. Your production image doesn't need testing libraries or build tools. - •
EXPOSE 5000— documents the port. Make sure this matches thePORTin your Express app and the Ingress Target Port you'll set in Step 3.
Run the Cloud Build
With your Dockerfile in place, run:
# Build and push in one step — no local Docker required
az acr build --registry myappregistry --image my-node-app:v1 .
This command:
- •Zips your local source directory and uploads it to ACR
- •Builds the image on Azure's infrastructure (amd64 Linux)
- •Pushes the final image to your registry automatically
No docker build, no docker push, no architecture mismatch.
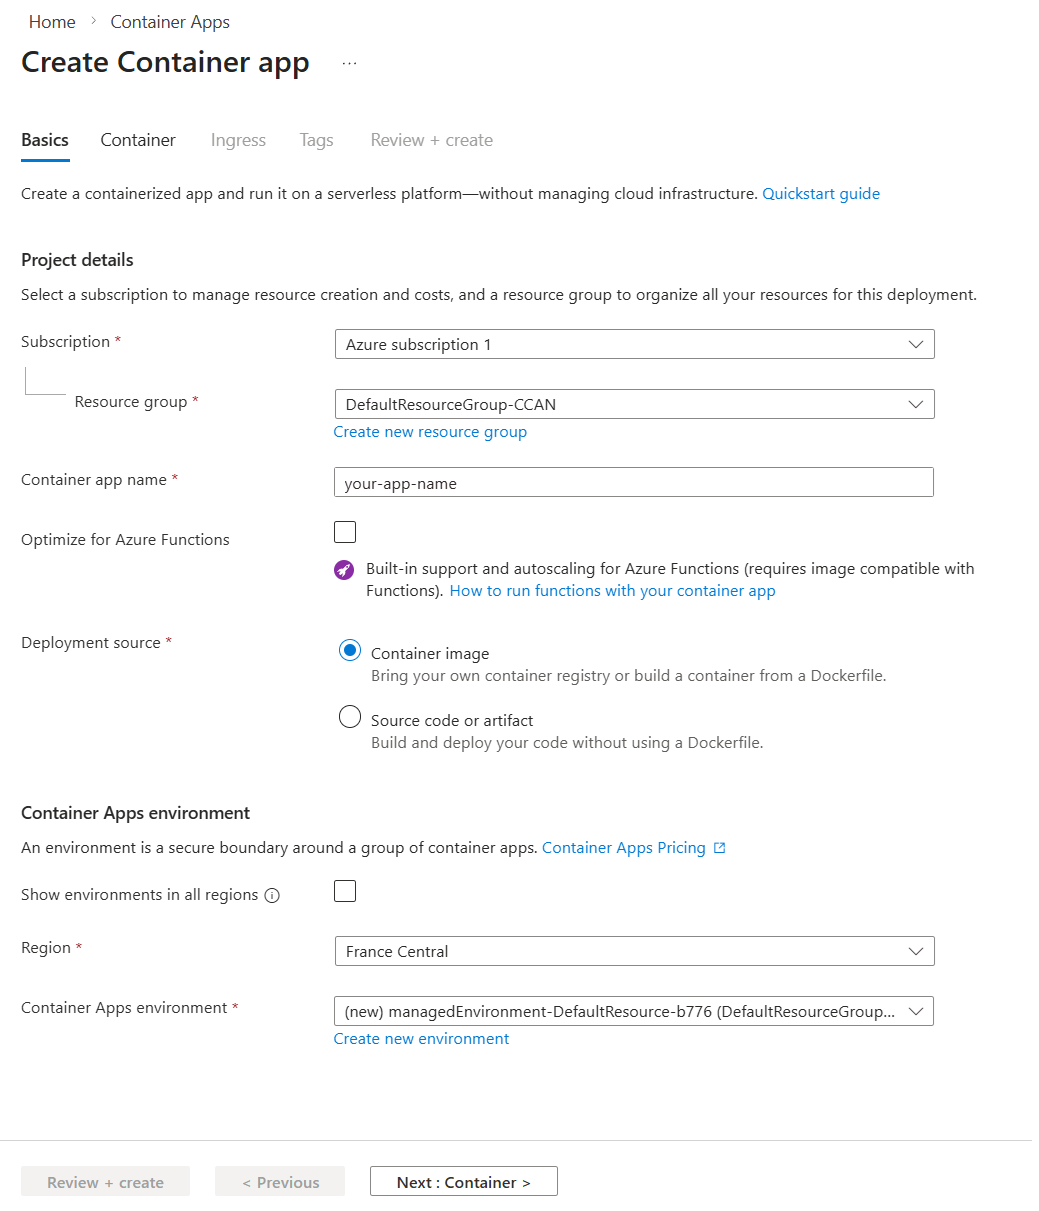
Step 3 — Create the Container App
In the Azure Portal, search for Container Apps and click Create.
Basics Tab
- •App name — e.g.,
my-node-app - •Region — match the region of your ACR
- •Container Apps Environment — create a new one if this is your first app. Give it a name and let Azure create the Log Analytics workspace automatically.
Container Tab
Select Azure Container Registry as the image source.
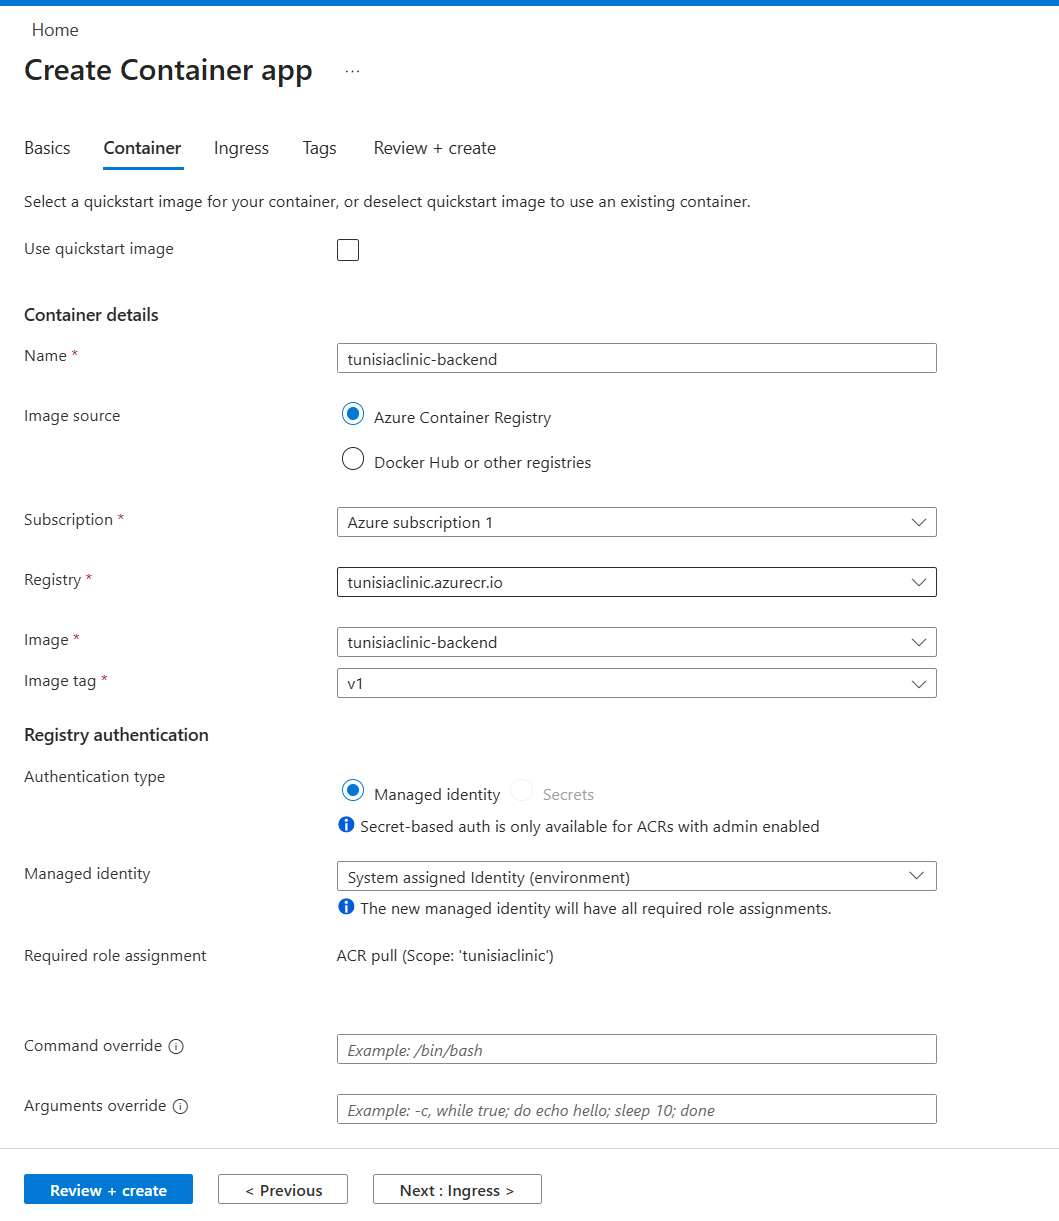
Fill in:
- •Registry — select the ACR you just created
- •Image —
my-node-app - •Tag —
v1
Set the CPU and memory to the smallest option that fits your app. For a typical Node.js backend, 0.5 CPU / 1Gi is a reasonable starting point.
Notice what you're pointing Azure to here: a container image (my-node-app:v1) stored in ACR — not your source code, not a zip file, not a Git repo. This is an important mental shift. The image is a self-contained, immutable snapshot of your app and everything it needs to run (Node.js runtime, dependencies, your code). Azure doesn't know or care what language it's written in — it just pulls the image and runs it. This is what makes containers portable: the same image that runs locally is the exact same artifact running in production, with no "but it worked on my machine" surprises.
Ingress Tab
Enable Ingress so your app is reachable from the internet:
- •Ingress traffic — Accepting traffic from anywhere
- •Target port — this must match the
PORTyour Express server listens on (e.g.,5000)
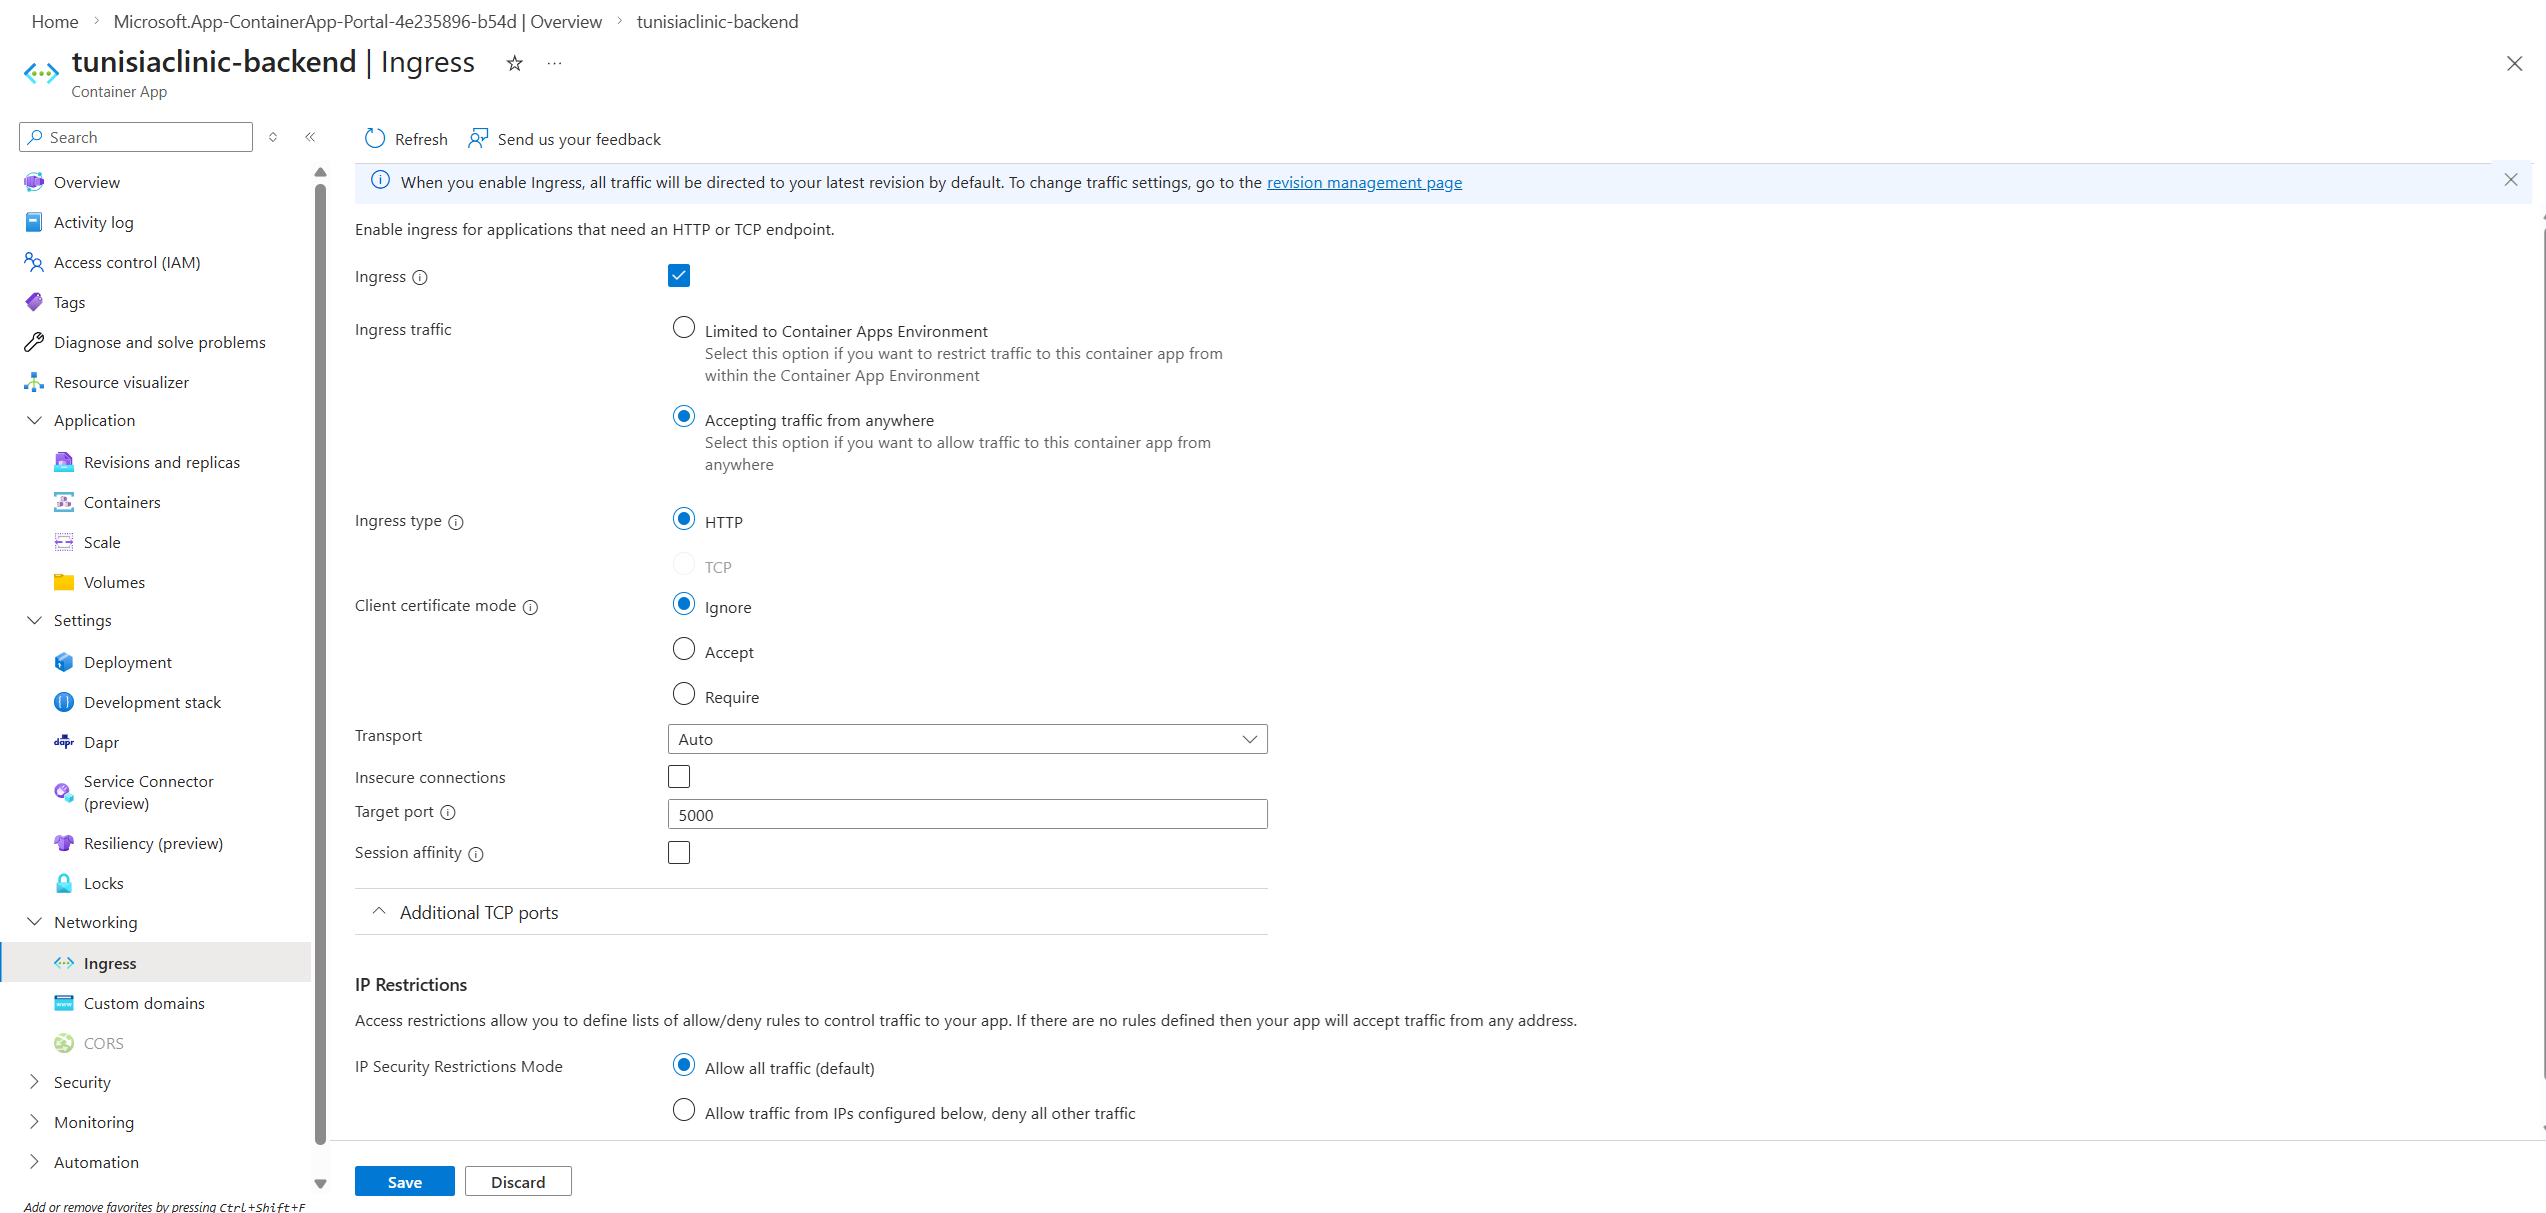
Common mistake: If your Express app listens on port
5000but you set the target port to80here, every request will time out. The portal won't warn you — the container will run, but no traffic will reach it.
Step 4 — Wire in Your Environment Variables
Your Node.js backend needs a MONGO_URI to connect to the database. Never hardcode this in your image.
After the app is created, go to Containers in the left menu and click Edit and Deploy.
In the container configuration panel, scroll down to Environment variables and add your secrets:
| Name | Value |
|---|---|
MONGO_URI | mongodb+srv://user:pass@cluster.mongodb.net/mydb |
PORT | 5000 |
NODE_ENV | production |
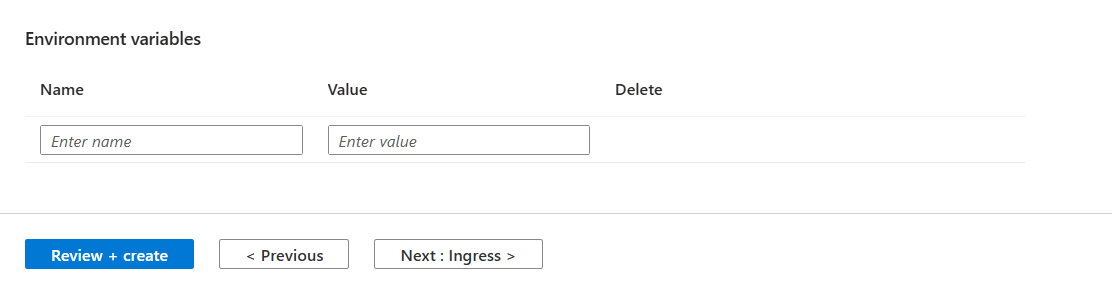
Click Save — this creates a new Revision with the updated config. By default, Container Apps runs in Single revision mode, which means the old revision is deactivated as soon as the new one activates. For true zero-downtime deploys, switch to Multiple revision mode under the Revisions menu — this keeps the old revision live until the new one is fully healthy.
Why this matters: Injecting variables here means you can swap databases, rotate credentials, or change configuration without rebuilding or re-pushing your Docker image. The image is immutable; the config is not.
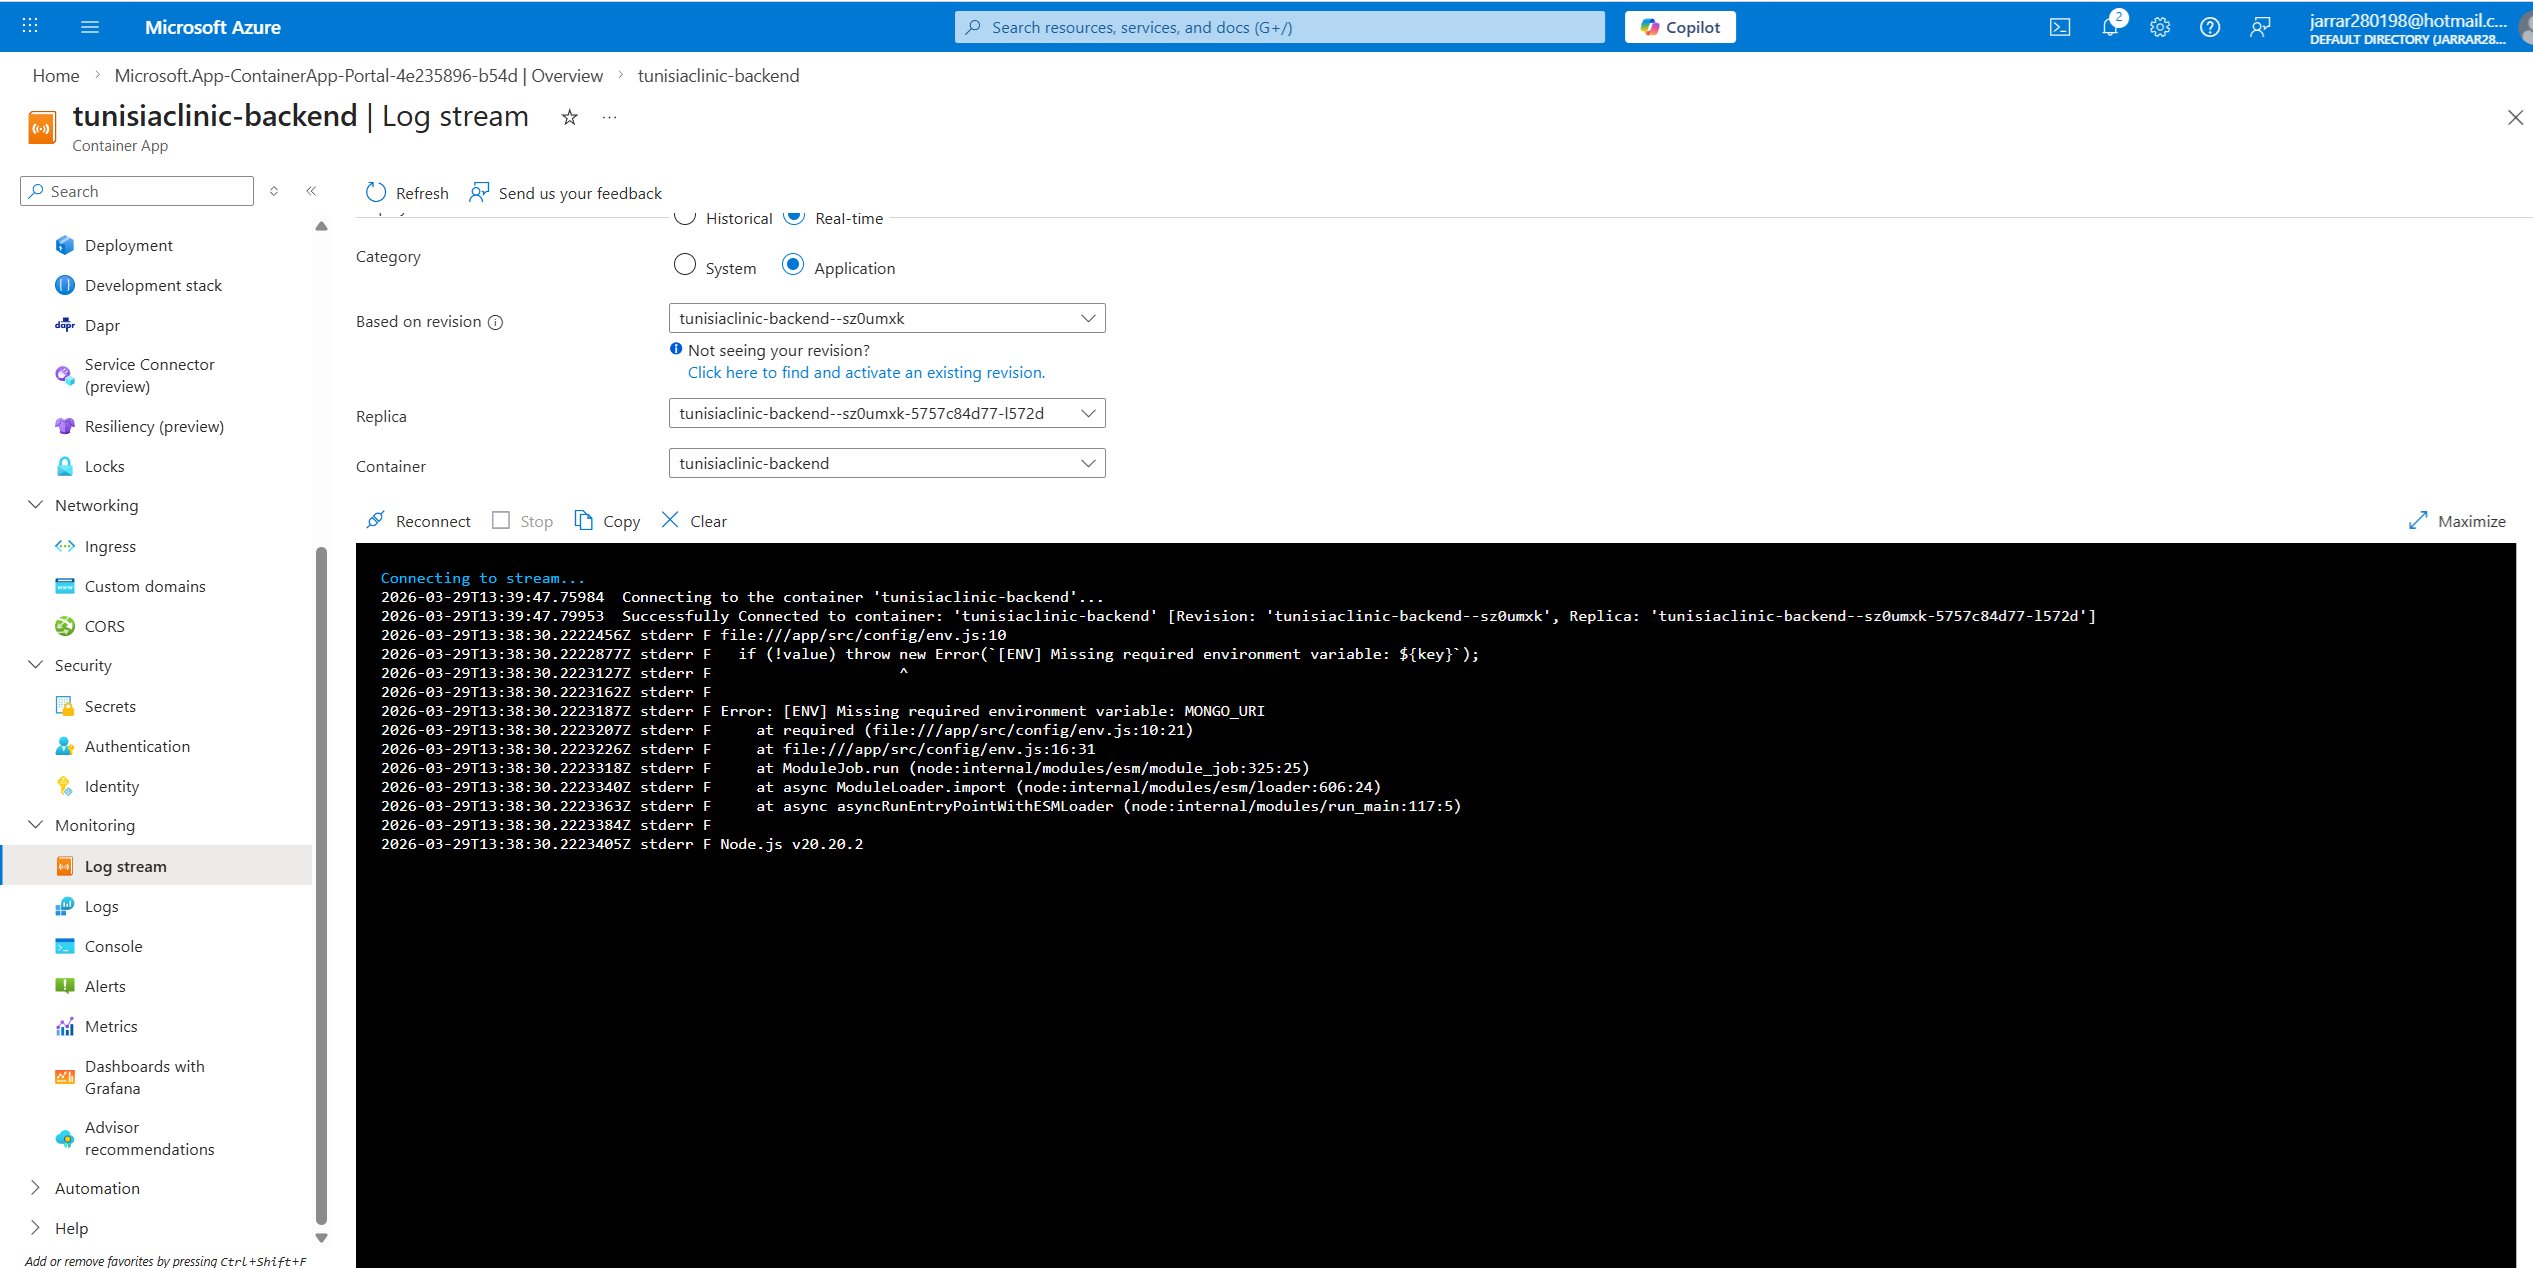
Step 5 — Check Logs and Debug
Once deployed, open the Log stream from the left menu. This is your first stop when something isn't working.
Troubleshooting Checklist
When your app isn't loading, check these before assuming the code is wrong. The most common failures are configuration issues, not code bugs.
| Symptom | Probable Cause | Fix |
|---|---|---|
| Blank screen / timeout | Port mismatch | Ensure Ingress Target Port matches your app's PORT (e.g., 5000) |
JSON "Route not found" | Code logic | The container is running — check your Express.js route definitions |
| App crashes on startup | Missing env var | Check the Log stream — your app will log which variable is undefined. Add it in Containers > Edit and Deploy |
| DB connection timeout on boot | Firewall blocking | Your Container App has dynamic outbound IPs — add them to your MongoDB Atlas or Cosmos DB firewall rules |
Database Firewall: The Most Common Silent Failure
Your Container App in, say, francecentral has a dynamic set of outbound IP addresses. If your MongoDB Atlas cluster or Cosmos DB instance has IP-based firewall rules, these IPs must be whitelisted — or your app will silently time out when it tries to connect on startup.
To find your outbound IPs, go to Networking in your Container App and look for the Outbound IP addresses list. Add each of these to your database firewall's IP allowlist.
Alternatively, if security requirements allow it, you can set the MongoDB Atlas firewall to allow access from anywhere (0.0.0.0/0) during development and lock it down before going to production.
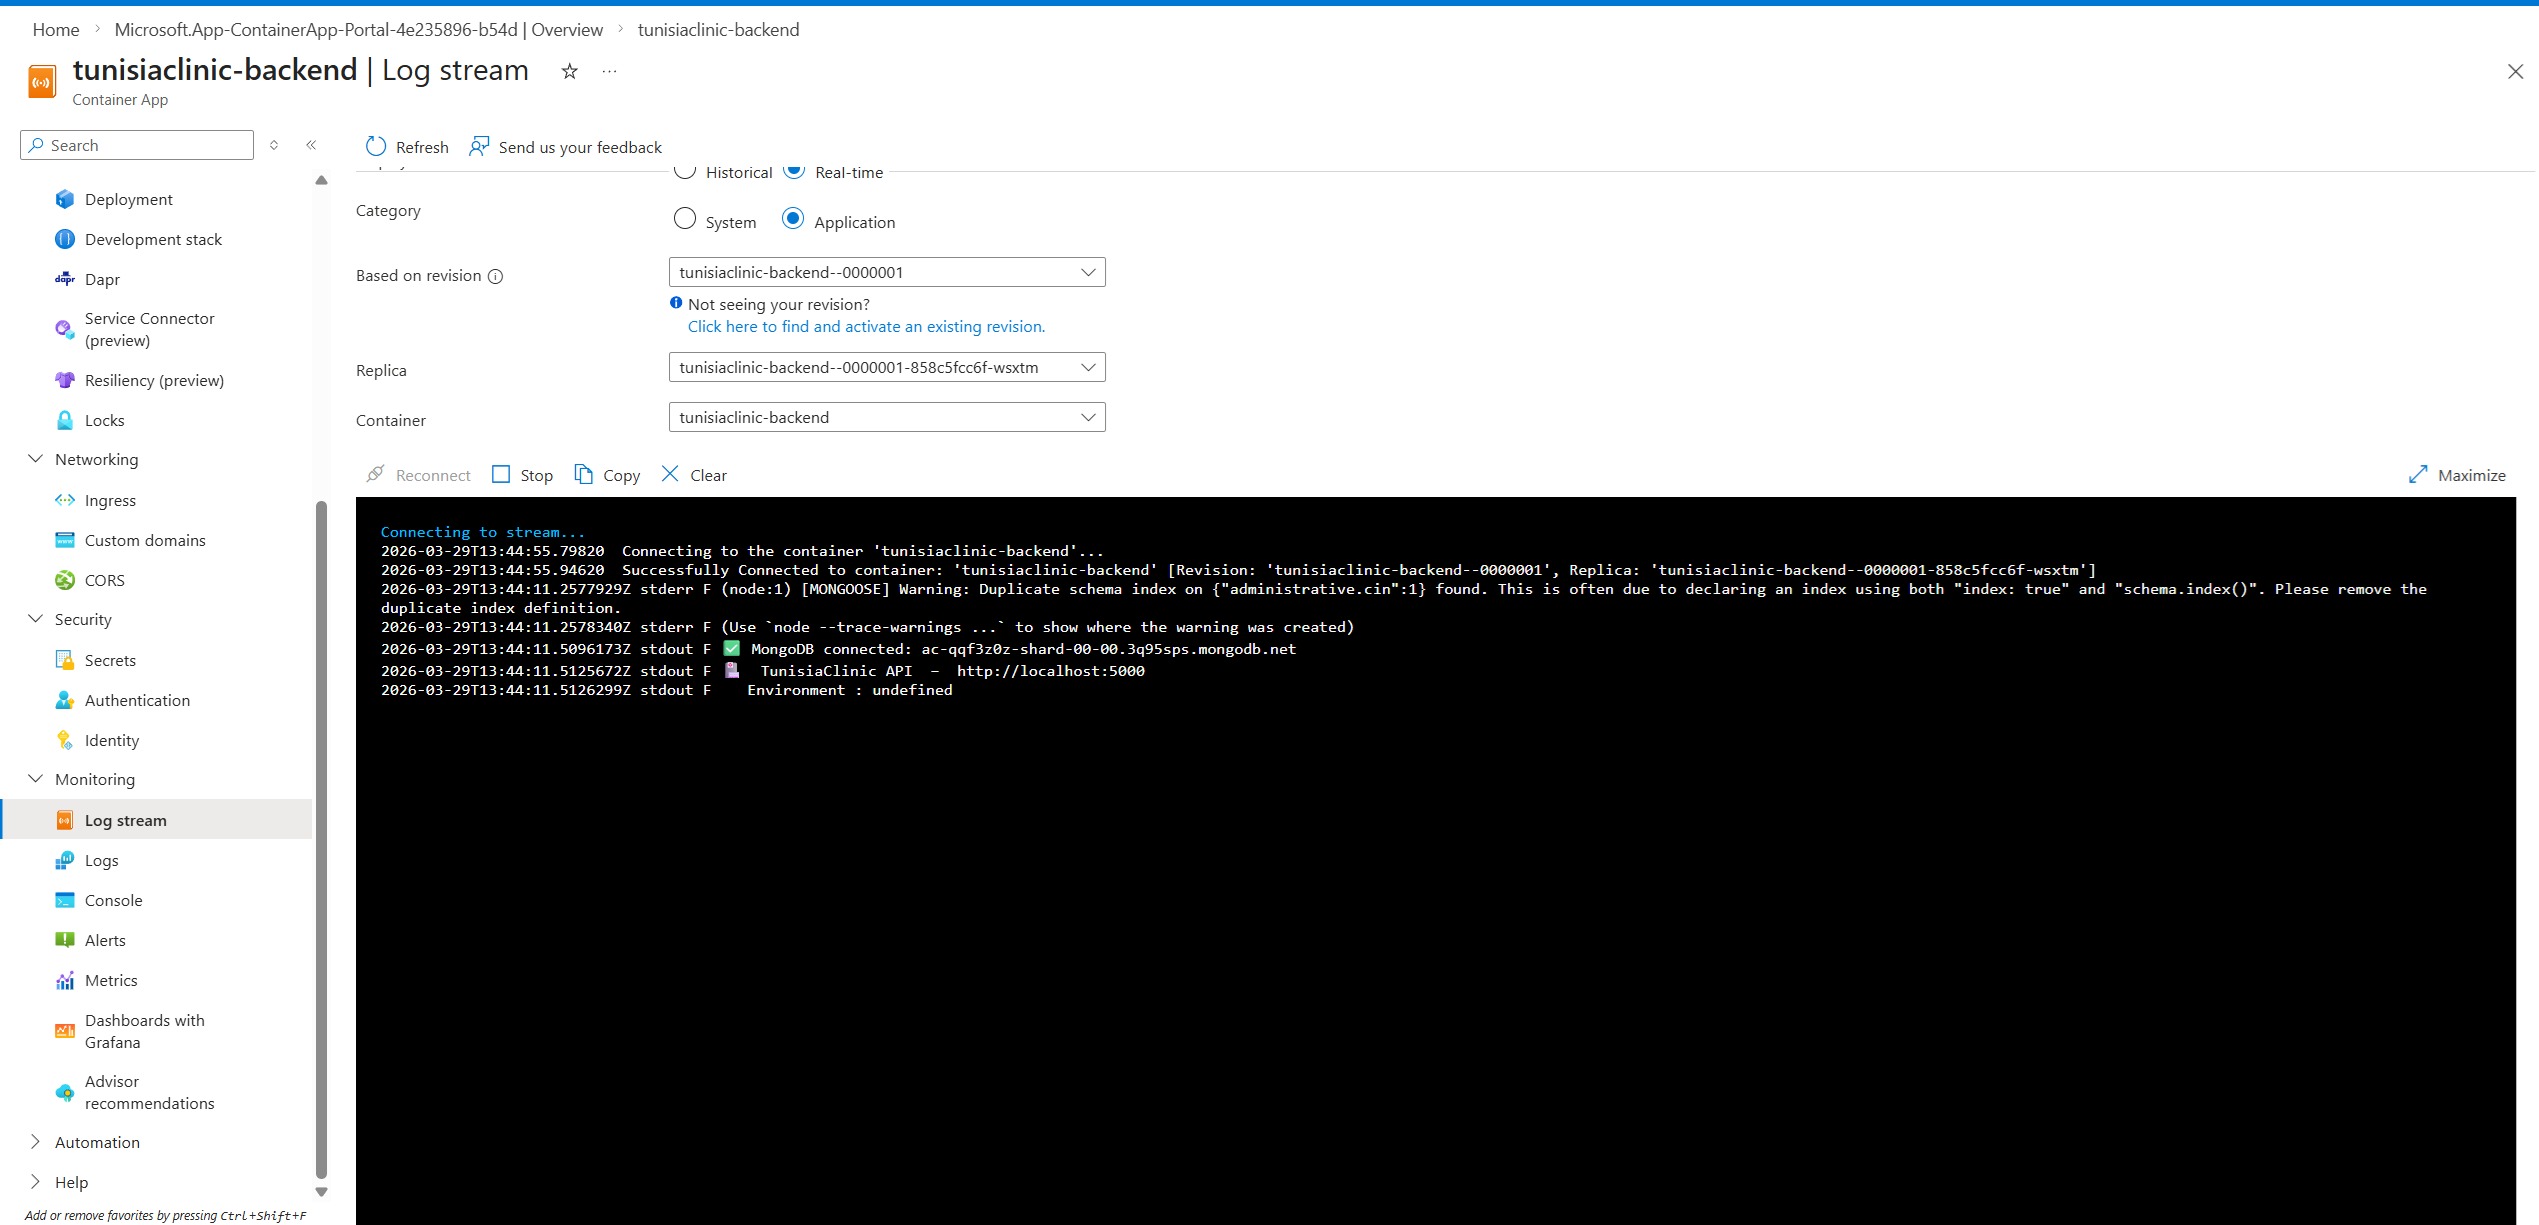
The App, Running
Once ingress is configured, environment variables are injected, and the database firewall is open to your outbound IPs — the app loads.
Summary
Azure Container Apps is the right default choice for containerized apps in 2026. Here's the full picture in one place:
- •ACR Tasks (
az acr build) — build in the cloud, avoid architecture mismatches - •Container App Environment — the secure boundary for your apps and logs
- •Ingress Target Port — must match your app's actual
PORT, no exceptions - •Environment Variables — inject via Edit and Deploy, never hardcode in the image
- •Outbound IPs — add to your database firewall, or connections will time out silently
- •Revisions — every config change is a new revision; zero-downtime by default
The pattern is clean once you understand the separation of concerns: your image is immutable, your config is injectable, and the platform handles the rest.
When you push a new version of your app, run az acr build again with a new tag (e.g., v2), then go to Containers > Edit and Deploy and update the image tag. That's the entire update cycle.
Aziz Jarrar
Full Stack Engineer